

Showing posts with label DIY. Show all posts
Showing posts with label DIY. Show all posts
Friday, November 30, 2012
more ruffle to my backside
After a bit of though I added more ruffles to the ruffle undies I made yesterday to create more a tutu effect. More is always better!


Thursday, November 29, 2012
ruffle my bum
Today I spent the day sewing a cute pair of ruffle undies for a client. I thought this would be a fun little project to share as the final result are adorable yet modest, and quite easy to make.
For this specific project I modified the Colleterie's pattern of these adorable bloomers. Go to the website below to download this easy pattern.

I've used this pattern a few times for costumes, but this pair called for something shorter and sitting higher on the waist. I used tracing paper to drafted a new pattern with these specifications.

Then I cut the pattern out of red satin.


To stop the fabric from fraying during the sewing process and wear, all edges of each piece were overlocked.


I then placed both A pieces together and both B pieces (with wrong sides out) and ran the front and pack seams of the undies to create a front half and a back half.


I then attached the front to the back by creating a crotch seam and the side seams. Again, making sure wrong sides are facing out.


Now after only a few easy steps - I've made a pair of shorts!

To create the bloomers, a hem along the top and leg seams was made large enough for the elastic to be pulled through to scrunch up the fabric. I made sure to leave a gap in the seam so you can pull through the elastic.


To create the ruffles, I cut stripes of black fabric and sewed them together to create a really long strip, almost 2m long! Folding it in half, I ran a seam along the long edge to create a tube and then turned it inside out. This process took a while and was a little bit frustrating - but a good TV show always makes it a little bit easier.


I hand stitched all the ruffling down and added a second strip. You could do this on the machine if you wanted to save time - but I don't like how a sewing machine flattens the ruffles in this process.
To finish the panties I pulled the elastic through the waistband and the legs and VOILA!

For this specific project I modified the Colleterie's pattern of these adorable bloomers. Go to the website below to download this easy pattern.

I've used this pattern a few times for costumes, but this pair called for something shorter and sitting higher on the waist. I used tracing paper to drafted a new pattern with these specifications.

Then I cut the pattern out of red satin.


To stop the fabric from fraying during the sewing process and wear, all edges of each piece were overlocked.


I then placed both A pieces together and both B pieces (with wrong sides out) and ran the front and pack seams of the undies to create a front half and a back half.


I then attached the front to the back by creating a crotch seam and the side seams. Again, making sure wrong sides are facing out.


Now after only a few easy steps - I've made a pair of shorts!

To create the bloomers, a hem along the top and leg seams was made large enough for the elastic to be pulled through to scrunch up the fabric. I made sure to leave a gap in the seam so you can pull through the elastic.


To create the ruffles, I cut stripes of black fabric and sewed them together to create a really long strip, almost 2m long! Folding it in half, I ran a seam along the long edge to create a tube and then turned it inside out. This process took a while and was a little bit frustrating - but a good TV show always makes it a little bit easier.

Then, I sewed along the middle of the tube in large stitches and pull to scrunch up the fabric. I pinned the ruffles onto the undies while doing this to save time and to find out how much tubing I needed to go around.


To finish the panties I pulled the elastic through the waistband and the legs and VOILA!

Tuesday, November 27, 2012
Bigger than Bells
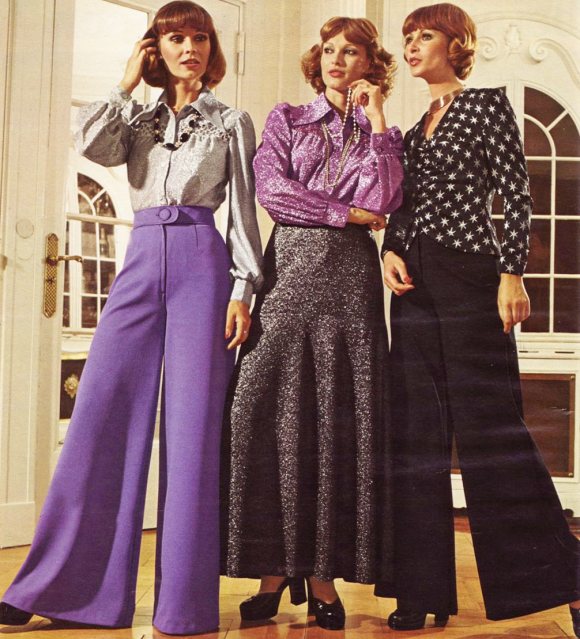
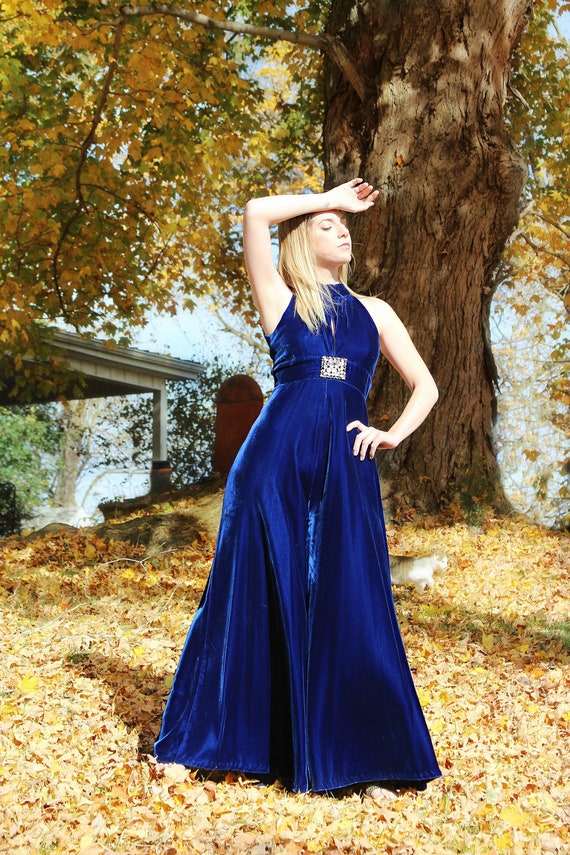
It's amazing what you can do with a pair of pants! They can be so big you can make a skirt out of them, or the bell is so large they wing out, or you cross the front and back over to create the most amazing slit up the side of the leg!
On my travels through cyber space I came across this handy little blog post on how to make your own Bell Bottom yoga pant! It's easy to follow and the results look fantastic! My bells are quite larger than this and a teeny weeny bit more sparkly, but it's a good place to start!
Check out Me Sew Crazy and cute tutorial on DIY Bell Bottom Yoga Pants!
Below is a collection of my image research. It was a blast looking at all of these - some are amazing and some are just hideous!



Wednesday, May 9, 2012
Next project: Custom "Poison Ivy" Corset Dress for Drea Rose
The next custom order on the list is a "Poison Ivy" Corset dress for the darling Drea Rose (who is now unfortunately back in Canada). She wants something very modern, yet sophisticated...and obviously green with vines.

So I've found this stunning 1911 corset pattern that I'll be working off. It's an underbust, so I'll have to modify the pattern to be an overbust, but it's short enough that it'll be a full dress on the tiny Drea and it'll be fully corsetted from the thigh to the bust (as some corset dresses are just corseted around the midsection).


Photos from Bridges of the Body
The Blog "Bridges on the Body" have a step by step guide for this corset pattern. Check it out! You can follow her along in the making of her own 1911 corset dress and every trick of the trade is explained.
I'm so excited to start!!! Now I just need to find some awesome fabric.
Monday, February 20, 2012
break my heart
For the fabulous Valentines day gig, I made a new pair of nipple pasties. Way way back in the archives of this blog is a great DIY post on how to make a pair of nipple pasties. It's been the most popular post on my blog because I made it so easy.
But for this pair I decided to change my technique - mainly because I had no craft foam at home and no time to run to the store. I did my research and found OUCHIES instructions on how to make nipple pasties out of card and fabric. GENIUS! These babies look so much classier and have a better shape to them.

While performing I've noticed that the craft foam doesn't stick as well and is so thick that it gets in the way. I popped a paistie once in a fan dance because the fan ripped it off. These card/fabric pasties don't seem to have that problem.
The problem I did have was that the diamontes fell off - but just paint a layer of clear nail polish on the top and that should stop it. I was just running out of time, and stuff that like is easy to fix (as you can see, I fixed them...yay!) All you need is extra crystals, gem tac and a good pair of hooked tweezers.
I've also found that a combination of double sided tape and spirit gum is the best to keep pasties on. I had a layer of tape on the edges of the hearts and then put spirit gum in the spaces. The tape keeps it stuck while the spirit gum dries, and you feel much more secure.
Hope this new post on nipple pasties has helped. Check out OUCHIES pastie post:
Monday, January 30, 2012
Hand painted Litas
So, it's my down season again which means it's time to figure out ways to waste my time.
I've always admired the design of the Jeffery Campbell Litas but found they were never really right for me. When they came out I actually thought they were quite ugly and impractical, but respected the boldness of the design and how the fuck girls could walk in them. Then, as more chunky shoe designs came out, I fell further and further down the Lita hole. They're tall yet incredibly comfortable and easy to wear!
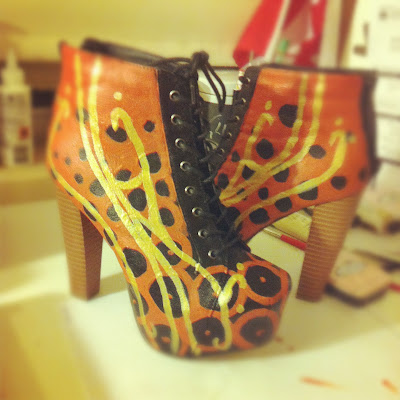
For a DIY project, I decided to design my own Litas. I cheaped out and bought a pair of pleather copy-cats, the Frida boot from Rubi Shoes for $60 to paint (instead of the $160USD on Solestruck). They didn't have a 35 (yes, I have very small feet), so had to opt for a 37 and MASSIVE innersoles.

It took me a while to figure out what I wanted to paint on them. I was inspired by the recent Picasso exhibition in Sydney and thought something bold and abstract would be the way to go - but then thought against it because there wasn't much in my closet to match. I then went through all my fashion and art books and fell in love with this 1920s fashion illustration in orange, gold and black.




Follow me on instagram to keep up to date with my photos and projects - username marjdj
I've always admired the design of the Jeffery Campbell Litas but found they were never really right for me. When they came out I actually thought they were quite ugly and impractical, but respected the boldness of the design and how the fuck girls could walk in them. Then, as more chunky shoe designs came out, I fell further and further down the Lita hole. They're tall yet incredibly comfortable and easy to wear!
For a DIY project, I decided to design my own Litas. I cheaped out and bought a pair of pleather copy-cats, the Frida boot from Rubi Shoes for $60 to paint (instead of the $160USD on Solestruck). They didn't have a 35 (yes, I have very small feet), so had to opt for a 37 and MASSIVE innersoles.

It took me a while to figure out what I wanted to paint on them. I was inspired by the recent Picasso exhibition in Sydney and thought something bold and abstract would be the way to go - but then thought against it because there wasn't much in my closet to match. I then went through all my fashion and art books and fell in love with this 1920s fashion illustration in orange, gold and black.

Then I just got my act together and started painting. Step by step. Started with the base coat of orange circles, layer after layer to get a flat colour.

Then I moved onto the gold detailing. To finish up I fixed all my mistakes and topped it all off with a coat of glow in the dark paint over the gold for extra umpf.


Follow me on instagram to keep up to date with my photos and projects - username marjdj
Sunday, April 24, 2011
DIY: Nipple Tassels
I thought I'd share my knowledge today and post some instructions on how to make your own nipple pasties. It's a bit of a "cat out of the bag" seeing as I'm also selling this babies in my Etsy store. But if you're cheap like me, you can probably get a result very similar to mine by making your own.


Step 1: Get all you materials together. You'll need some craft foam (choose a colour that either matches or will disappear behind the sequins - black or white is best), sequin tape, 2 matching tassels, glue gun, glue, good scissors, circle template (or coffee mug), tweezers, scalpel and "thread cutters"(easier to cut in small areas).


Step 5: Using your glue gun, run a small bead of glue along one side of the "piece of pie".


Step 7: Sequin time! Start by running a bead of glue around the edge of the circle. Quickly get your sequin "tape" and start glueing it bit by bit around the circle.


Then do the other one, but be sure to spiral in the opposite direction so they mirror each other.


Step 8: Tassel Time! You'll need your tassels, a scalpel and the tweezers.

With the scalpel, cut a small slit in the point of the cone. Make sure you go right through to the other side.


Step 9: Grab hold of the end of the tassel with your tweezers, and from the sequin side inwards, push the end of the tassel through the slit you just made. Pull out your tweezers without pulling out the end of the tassel (it's a bit tricky at first, but you'll get the hang of it after a few tries). Pull the tassel through so the knot of the tassel falls at the edge of the circle of the pasty.


Step 10: Using a massive dob of glue, glue down the edge of the tassel to the inside of the cone.

Step 11: Using a bit of felt, cover the glue spot to make it look pretty and it's also soft on your poor nipple.


Step 1: Get all you materials together. You'll need some craft foam (choose a colour that either matches or will disappear behind the sequins - black or white is best), sequin tape, 2 matching tassels, glue gun, glue, good scissors, circle template (or coffee mug), tweezers, scalpel and "thread cutters"(easier to cut in small areas).

Step 2: Draw your circle using the template. You'll want to measure your nipple (embarrasing, I know) and then draw a circle about 1 to 2 cm bigger than that. I used a coffee mug for this tassel design so they'd be a bigger design. Normally I use an architect's circle template. You can also make a heartshape template by drawing two circles touching and then make the point.

Step 3: Cut the circles out. You'll need good scissors - I actually use fabric scissors. Don't worry, the foam doesn't harm your good fabric scissors like paper does. It's soft enough.

Step 4: Cut a "piece of the pie" out of the circle. You do this so when you fold the circles together they create a cone shape that snuggly "hugs" your boobie.


Step 6: "Fold" together the two edges of the "pie" and hold to glue together. You will have to hold it for about a minute to keep the edges from pulling apart before the glue sets. Don't worry about glue globs - they will be hidden by the sequins.

Now you've got your nipple pasties! It's time to decorate.


Then start to "spiral" towards the center, making sure not to leave a gap between rows. Once you get to the middle and finish, use the thread cutters to get a clean cut. Take the last sequin (which will probably fall off when you cut it) and glue that separately in the middle.

Then do the other one, but be sure to spiral in the opposite direction so they mirror each other.


With the scalpel, cut a small slit in the point of the cone. Make sure you go right through to the other side.


Step 9: Grab hold of the end of the tassel with your tweezers, and from the sequin side inwards, push the end of the tassel through the slit you just made. Pull out your tweezers without pulling out the end of the tassel (it's a bit tricky at first, but you'll get the hang of it after a few tries). Pull the tassel through so the knot of the tassel falls at the edge of the circle of the pasty.


Step 10: Using a massive dob of glue, glue down the edge of the tassel to the inside of the cone.

Step 11: Using a bit of felt, cover the glue spot to make it look pretty and it's also soft on your poor nipple.

TA DA!!!

From these simple steps you can make any shape, colour, etc!

Subscribe to:
Posts (Atom)


